

To georeference an image in ArcGIS Pro, it must first be added as a raster layer. Common file formats include TIFF, JPG, and PNG. Topographic maps often include coordinate grids that help identify points using latitude and longitude.


Steps to Add a Raster Image:
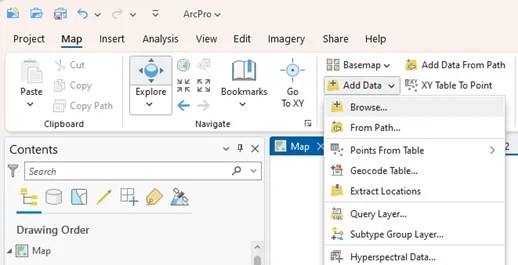
- Go to the Map tab.
- Click on Add Data in the Layer group.
- Select Browse.
- Navigate to the folder containing the image (e.g., “06_georeference/image.png”).
- Select the file and click OK.
Alternatively, right-click the map name in the Contents panel and select Add Data.
The Add Data button allows adding vector layers, raster images, or tables to the project and is frequently used in ArcGIS Pro.

When a raster is added for the first time, ArcGIS Pro may prompt to build pyramids. These improve display performance by creating multiple resolution levels. It is recommended to click Yes when prompted.
Once the image is added, it may not be visible immediately. A message stating “Unknown Coordinate System” may appear, indicating that the image lacks spatial reference data. This can be ignored at this stage.
The layer will appear in the Contents panel as “image.png” along with its RGB bands. To display the image:
- Right-click the “image.png” layer.
- Select Zoom To Layer.


The image will now be visible and will serve as a base for georeferencing and creating new vector layers.
How to Obtain High-Resolution Aerial Images
High-resolution images can be acquired through:
- Purchasing from commercial providers.
- Requesting from government agencies or universities.
- Capturing images using drones.


Note: Free high-resolution imagery is not always available.